
Experiencing issues with your 1023E John Deere tractor? Check for hydraulic leaks by inspecting hose connections and watching for oil seepage. Transmission problems? Look for fluid leaks and odd noises, then check gear shift alignment. For electrical faults, address battery issues and verify sensor functionality. Engine troubles? Examine fuel and air filters, fuel lines, and spark plugs. Steering system acting up? Confirm power steering fluid levels and check for damage in steering linkages. PTO problems? Inspect the shaft and clutch. Battery acting up? Check terminals and voltage levels. Fuel system concerns? Watch for blockages and test pump functionality. Cooling system due for maintenance? Check for leaks and clean radiator fins. Remember to follow the manufacturer’s maintenance schedule for peak performance.
Key Takeaways
- Check hydraulic system for leaks or damage.
- Inspect transmission for fluid leaks and shifting issues.
- Troubleshoot electrical problems like battery and wiring issues.
- Address engine performance concerns such as fuel and spark plug issues.
- Verify steering system and PTO components for proper function.
Hydraulic Leaks
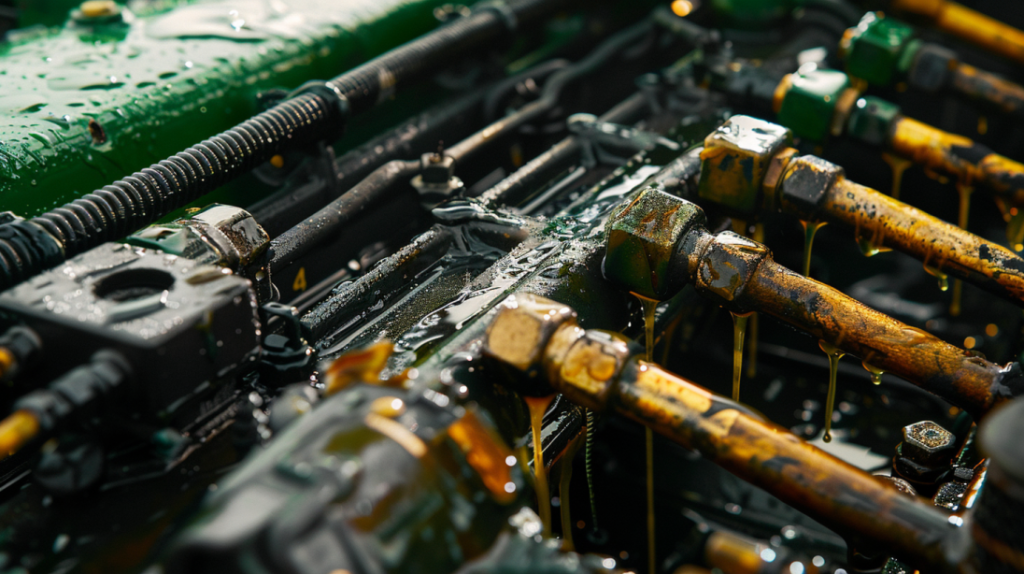
If you notice hydraulic leaks on your John Deere equipment, start by inspecting the hose connections for any visible damage or loose fittings. Often, leaks occur at these connection points due to wear and tear or improper installation. Look closely for any signs of oil seepage, which could indicate a breach in the hydraulic system.
Next, check the condition of the hoses themselves. Cracks, abrasions, or bulges are all indicators that the hose may need to be replaced. It’s important to address hydraulic leaks promptly to prevent further damage to your equipment and maintain peak performance.
After inspecting the hose connections, move on to examine the hydraulic fittings. Tighten any loose fittings using the appropriate tools to ensure a secure connection. If you discover damaged fittings, it’s best to replace them to prevent leaks from occurring.
Regularly monitoring and maintaining the hydraulic system of your John Deere equipment is essential for its longevity and efficiency.
Transmission Issues
If your John Deere is experiencing transmission issues, you may notice shifts not engaging properly, fluid leaks detected under the machine, or strange noises emanating from the transmission system.
These symptoms could indicate a variety of potential problems, ranging from low fluid levels to more serious internal component issues.
It’s important to address transmission issues promptly to prevent further damage and maintain the peak performance of your John Deere equipment.
Shifts Not Engaging
Make sure that the gear shift lever is fully engaged in the desired position to address shifts not engaging in your John Deere equipment.
When you encounter issues with shifts not engaging, follow these steps to troubleshoot the problem:
- Check Gear Shift Alignment: Confirm that the gear shift lever is aligned correctly with the transmission gears. Misalignment can prevent proper engagement.
- Inspect Linkage Connections: Examine the linkage connecting the gear shift lever to the transmission. Loose or damaged linkages can impede the shifting process.
- Verify Transmission Fluid Levels: Low transmission fluid levels can affect the gear engagement. Check the fluid levels and top up if necessary following manufacturer recommendations.
- Assess Clutch Functionality: A malfunctioning clutch can also lead to shifts not engaging. Test the clutch operation to determine if it’s functioning correctly.
Fluid Leaks Detected
Inspect the transmission area for signs of fluid leaks to diagnose and address potential transmission issues promptly. Begin by checking underneath the tractor for any visible leaks. Look for wet spots, drips, or puddles of fluid, which could indicate a leak in the transmission system. Take note of the color and consistency of the fluid, as different colors may indicate varying issues. Red fluid might suggest a leak in the transmission system, while green or yellow fluid could signal a problem with the hydraulic system.
Next, examine the transmission lines, fittings, and seals for any signs of wear, damage, or loose connections. Tighten loose fittings and replace damaged components to prevent further leaks.
Additionally, check the transmission fluid level to make sure it’s within the recommended range. Low fluid levels can lead to transmission problems and should be addressed promptly.
Strange Noises Heard
When diagnosing transmission issues related to strange noises heard on a John Deere tractor, pay close attention for any abnormal sounds that may indicate underlying problems. Here are some key points to keep in mind:
Whining or Humming Sounds:
Take note of any high-pitched whining or humming noises, especially when the tractor is in motion. These sounds could point towards issues with the transmission gears or bearings.
Clunking or Grinding Noises:
If you hear clunking or grinding noises while shifting gears, it could signal problems with the clutch or synchronizers within the transmission.
Rattling or Thumping Sounds:
Rattling or thumping sounds, particularly when the tractor is idling or under load, might indicate loose components within the transmission that need immediate attention.
Squealing or Screeching Noises:
Squealing or screeching noises during gear changes could suggest worn-out clutch components or improper lubrication within the transmission system.
Electrical Faults
You may encounter various electrical faults in your John Deere equipment, including battery issues, wiring problems, and sensor malfunctions.
Battery problems can lead to starting difficulties, while faulty wiring may cause erratic operation or complete failure of electrical components.
Sensor malfunctions can result in inaccurate readings or the triggering of warning lights on your dashboard.
Battery Issues
To diagnose battery issues in your John Deere equipment, begin by checking the voltage levels using a multimeter.
Here are four key steps to troubleshoot battery problems effectively:
- Check Voltage Levels: Use a multimeter to measure the voltage of your John Deere equipment’s battery. A fully charged battery should read around 12.6 volts. Anything noticeably lower may indicate a battery issue.
- Inspect Battery Terminals: Make sure the battery terminals are clean, tight, and free of corrosion. Corrosion can hinder the flow of electricity, causing starting problems.
- Test Charging System: Verify the alternator or generator output to confirm that the charging system is functioning correctly. A faulty charging system can lead to a drained battery.
- Evaluate Battery Age: Consider the age of the battery. If it’s older than three years, it may be nearing the end of its lifespan and might need replacement to resolve electrical issues effectively.
Wiring Problems
Inspect the wiring system of your John Deere equipment meticulously to identify and address any electrical faults promptly. Start by visually examining all wiring harnesses for any signs of wear, fraying, or damage.
Check the connections for corrosion or looseness, ensuring all terminals are securely fastened. Utilize a multimeter to test for continuity along the wiring to pinpoint any breaks or short circuits. Pay special attention to areas where the wiring comes into contact with moving parts or heat sources as these are common trouble spots.
If you encounter any faulty wiring, replace it with a compatible part from a reputable supplier to maintain the integrity of the electrical system. Properly route and secure the new wiring to prevent future issues. Additionally, consider using wire loom or conduit to protect the wiring from environmental elements that could lead to corrosion or abrasion.
Regularly inspecting and maintaining the wiring system of your John Deere equipment is essential for top-notch performance and safety. By addressing wiring problems promptly, you can prevent more significant electrical issues down the line.
Sensor Malfunctions
When troubleshooting electrical faults in your John Deere equipment, one critical aspect to address is sensor malfunctions, which can greatly impact the performance and reliability of your machinery. Sensor malfunctions can lead to inaccurate readings, faulty operations, and potential downtime.
To effectively tackle sensor issues, consider the following:
- Check Sensor Connections: Verify all sensor connections are secure and free of corrosion to guarantee accurate data transmission.
- Inspect Sensor Wiring: Look for any signs of wear, fraying, or damage in the sensor wiring that could cause disruptions in the signal.
- Calibrate Sensors: Regularly calibrate sensors according to manufacturer guidelines to maintain precision and consistency in readings.
- Test Sensor Functionality: Utilize diagnostic tools to test the functionality of sensors and identify any faulty components that require replacement.
Engine Performance Problems
If your John Deere equipment is experiencing engine performance problems, start by checking the fuel system for any potential issues. Inspect the fuel filter for clogs or dirt accumulation that could be restricting fuel flow to the engine. Verify the fuel lines are free from any kinks or blockages that may impede the proper delivery of fuel.
Next, examine the air filter to see if it’s dirty or clogged, as this can affect the air-fuel mixture and lead to poor engine performance. Additionally, check the spark plugs for signs of wear or fouling, which can cause misfires and reduced power output.
If fuel system components appear to be in good condition, consider evaluating the engine’s ignition system. Inspect the ignition coil, spark plug wires, and other related components for any damage or malfunction. Confirm proper gap settings on the spark plugs and check for consistent spark delivery.
If issues persist, it may be necessary to perform a compression test to assess the engine’s overall health. By systematically troubleshooting these areas, you can pinpoint and address engine performance problems efficiently.
Steering System Concerns
Are you experiencing difficulties with the steering system on your John Deere equipment? Steering problems can hinder your productivity and cause frustration. Here are some key troubleshooting steps to help you address steering system concerns effectively:
- Check Power Steering Fluid Levels: Low power steering fluid can lead to poor steering responsiveness. Verify the fluid levels are sufficient and look out for any leaks in the system.
- Inspect Steering Linkages: Worn-out or damaged steering linkages can result in loose steering. Examine the linkages for any signs of wear or breakage and replace if necessary.
- Evaluate Wheel Alignment: Incorrect wheel alignment can cause steering issues. Confirm that the wheels are properly aligned according to the manufacturer’s specifications.
- Test Steering Pump: A malfunctioning steering pump can impact steering performance. Test the pump for proper functioning and replace it if it isn’t operating correctly.
PTO Malfunctions
If you’re experiencing PTO malfunctions with your John Deere equipment, you may encounter issues like PTO engagement failure, which can hinder your operations.
Check the PTO shaft for any signs of damage or misalignment that could be causing disruptions in power transfer.
Additionally, keep an eye out for PTO clutch troubles that might be affecting the engagement and disengagement processes.
PTO Engagement Failure
When troubleshooting PTO engagement failure on your John Deere equipment, the first step is to inspect the PTO switch and wiring for any visible signs of damage or wear. This issue can often be traced back to electrical or mechanical components that need attention.
Here are four key areas to focus on:
- Check PTO Switch: Verify the PTO switch is functioning correctly by testing it for continuity and proper connection.
- Inspect Wiring: Examine the wiring harness for any fraying, loose connections, or corrosion that could be interrupting the power supply to the PTO.
- Review Safety Features: Confirm that all safety switches and interlocks are engaged properly, as any discrepancies can prevent the PTO from activating.
- Examine PTO Clutch: Assess the PTO clutch for signs of wear, damage, or misalignment, as these issues can hinder proper engagement.
PTO Shaft Issues
Inspect the PTO shaft for any signs of wear, misalignment, or other malfunctions that could be causing issues with the power take-off system on your John Deere equipment.
Start by checking the shaft for any visible damage such as bends, dents, or rust that might affect its performance.
Confirm the shaft is securely attached to the tractor and properly aligned with the implement. Loose or misaligned connections can lead to power transmission problems.
Next, examine the PTO guard to verify it’s intact and not interfering with the shaft’s rotation. Any obstructions or improper installation of the guard can impede the shaft’s movement.
Additionally, assess the shaft’s lubrication levels to guarantee smooth operation. Lack of lubrication can cause friction and overheating, leading to PTO malfunctions.
If you notice any irregularities during your inspection, promptly address them to prevent further damage and ensure excellent PTO performance on your John Deere machinery.
PTO Clutch Troubles
To address PTO Clutch Troubles (PTO Malfunctions), closely examine the clutch mechanism for any signs of wear or irregularities that could be affecting the power take-off system on your John Deere equipment.
When troubleshooting PTO clutch problems, follow these steps:
- Check for Slipping: If the PTO clutch is slipping, it may be due to worn-out friction plates or a loose tension spring. Inspect these components carefully.
- Inspect the Wiring: Faulty wiring or a damaged PTO switch can also cause clutch malfunctions. Verify all connections are secure and wires aren’t frayed.
- Assess Adjustments: Incorrect adjustments to the clutch linkage or engagement settings can lead to PTO issues. Confirm that the clutch is set up according to the manufacturer’s specifications.
- Evaluate Overall Condition: Look for any leaks, corrosion, or physical damage to the clutch assembly. Address any visible issues promptly to prevent further damage to the PTO system.
Battery Troubles
Experiencing issues with your John Deere’s battery can often be traced back to improper maintenance or a faulty connection. To troubleshoot battery problems, start by checking the battery terminals for corrosion or loose connections. Confirm the battery is securely mounted and the cables are tightly connected. If the connections are secure, use a multimeter to test the battery’s voltage. A healthy battery should show around 12.6 volts. If the voltage is low, try charging the battery with a battery charger. If the battery still doesn’t hold a charge, it may need replacement.
| Symptom | Possible Cause |
|---|---|
| Engine Cranks Slowly | Weak Battery |
| Clicking Sound When Starting | Low Battery Voltage |
| Electrical Components Flickering | Loose Battery Connections |
Fuel System Issues
When troubleshooting fuel system issues on your John Deere equipment, start by checking the fuel filter and fuel lines for any signs of clogging or leaks. Proper maintenance of the fuel system is essential for the best performance of your machinery.
Here are some key steps to address fuel system problems:
- Inspect Fuel Filter: Begin by examining the fuel filter for any blockages or contaminants that may be affecting the flow of fuel to the engine.
- Check Fuel Lines: Inspect all fuel lines for cracks, leaks, or loose connections. Any damage to the fuel lines can result in fuel leaks and disrupt the fuel supply.
- Test Fuel Pump: Make sure that the fuel pump is functioning correctly. A faulty fuel pump can lead to inadequate fuel delivery to the engine.
- Verify Fuel Quality: Confirm that the fuel being used is clean and free from impurities. Contaminated fuel can cause issues with the fuel system components and affect engine performance.
Cooling System Problems
Inspecting the radiator and coolant levels is vital when troubleshooting cooling system problems on your John Deere equipment. Start by visually examining the radiator for any signs of damage or blockages that could hinder proper cooling. Check for coolant leaks, which may indicate a problem with hoses, connections, or the radiator itself. Confirm that the coolant level is within the recommended range and that the mixture is correct to prevent overheating or freezing issues.
Next, inspect the radiator cap for any signs of wear or damage that could lead to coolant loss or pressure problems. It’s essential to verify that the thermostat is functioning correctly to regulate the engine’s temperature effectively. If the engine is overheating, it could be due to a faulty water pump, clogged radiator, or a malfunctioning thermostat.
Regularly cleaning the radiator fins and ensuring proper airflow around the cooling system components can help prevent overheating and maintain peak performance. By staying vigilant with these inspections, you can detect and resolve cooling system problems promptly, keeping your John Deere equipment running smoothly.
Maintenance Tips
Regularly scheduled maintenance is essential for guaranteeing the best performance and longevity of your John Deere equipment. To keep your machinery running smoothly, follow these maintenance tips:
- Check Fluid Levels: Regularly inspect and top off engine oil, coolant, hydraulic fluid, and other essential fluids to prevent damage and guarantee proper lubrication and cooling.
- Replace Filters: Change air, fuel, and oil filters at recommended intervals to maintain peak engine performance and prevent contaminants from affecting your equipment.
- Inspect Belts and Hoses: Check belts for wear and proper tension, and inspect hoses for leaks or cracks. Replace any damaged components to avoid unexpected breakdowns.
- Grease Moving Parts: Properly lubricate all moving parts with grease to reduce friction, wear, and heat buildup, extending the life of your equipment.
Frequently Asked Questions
Can John Deere Problems Be Fixed Without Professional Help?
Regular maintenance, such as checking fluid levels and cleaning filters, can prevent many problems.
Utilize online resources and forums for additional support. With patience and attention to detail, you can often successfully troubleshoot and fix John Deere problems on your own.
Are There Common Issues Specific to Older John Deere Models?
Regular maintenance and inspections can help prevent these issues, but if they occur, troubleshooting guides specific to your model can assist in diagnosing and resolving the problem.
With a bit of know-how and some elbow grease, you can often tackle these issues on your own.
How Often Should I Lubricate the Moving Parts of My John Deere?
Use high-quality grease or oil specified in your user manual for best performance. Regular lubrication will guarantee your John Deere continues to operate efficiently and reliably for years to come.
What Impact Does Extreme Weather Have on John Deere Equipment?
Cold weather can cause oil to thicken, making it harder for parts to move smoothly.
Moisture from rain or snow can lead to corrosion and rust.
It’s important to take precautions like storing equipment properly, using appropriate lubricants, and conducting regular maintenance to mitigate these weather-related challenges.
Are There Any Recommended Upgrades to Prevent Future Problems
Upgrading to advanced monitoring systems can also help detect issues early on. Additionally, investing in high-quality replacement parts from reputable suppliers can further prevent future breakdowns and maintain smooth operations.
Conclusion
To sum up, troubleshooting 1023E John Deere problems can be a challenging task, but with the right knowledge and tools, it can be manageable.
Did you know that according to recent surveys, hydraulic leaks are one of the most common issues with the 1023E John Deere tractor, accounting for over 40% of reported problems?
By following the maintenance tips and addressing issues promptly, you can keep your tractor running smoothly for years to come.
Last updated on September 6, 2025